How Do I Turn My TV Into Digital Signage?
Turning a TV into digital signage is a simple and cost-effective way to create dynamic, engaging displays. Follow these steps to transform a regular TV into a digital signage display.
By John Barker on January 2, 2023
Digital signage can be a great way to add a proficient and immersing thing to your business space or event. You may wonder how you can develop a digital signage display with the gear you already have in your home or office, such as TV sets. Well, we’ve got you!
In this article, we’ll help you comprehend everything you need to know about digital signages, from what they are to how to set up your own display — efficiently and with minimal costs. You’ll also learn how to set up free digital signage that makes a lasting impression on your customers and improves the stakeholders’ experiences. So let’s get started!
What is Turning a TV Into Digital Signage All About?
Digital signage solutions are a way of transforming your television into an adequate and fascinating communication medium. It’s all about taking edge of the latest technology, like LCD screens and LED displays, to broadcast targeted data in real time. Intriguing visuals and dynamic content can be used to clasp attention, and turn spectators into buyers or supporters.
With digital signages, businesses have the opportunity to share information tailored particularly for their customers and audience. By turning your TV into digital signage, you will profit from features like quickly revamping content and data-driven decision-making to get the most out of your advertising dollars. Your TVs can be used as adaptable displays that showcase interactive menus, promotional materials, images, videos, and so much more — all created in minutes. With this simple yet powerful, cost-effective solution, giving customers fresh, relevant messaging has never been easier.
To assemble a digital signage software with a TV, you’ll need to attach extra hardware, like a media player that stores info and coordinates playback, as well as specialized software that lets you make the eye-catching presentation you need. With a digital signage system set up right, you can reap the rewards of a visual messaging system that gets noticed, understood, conveyed, and recollected — all without lifting a finger.
Requirements for Turning a TV Into Digital Signage
Have you ever wondered what it would take to turn your television into an electronic signage display? If so, you’re not alone. Many people want to employ the latest technologies and tools known for their business. And with digital signage, you can do just that. Here’s everything you need to turn your TV into digital signage.
-
A TV with HDMI Input is essential because it lets you connect all of the other elements of the system together readily. Not only does this conserve time when setting up, but it also ensures there are no compatibility problems between various devices. You’ll also need a Digital Signage Player or Device that is potent enough to operate your digital signage software. It should be able to come in the form of an embedded media player, streaming media player, or PC/Mac computer connected via HDMI cable.
-
There are various Digital Signage Software options available relying on what type of content you want to exhibit and how much customization you require in terms of design, layout, etc. Make sure that whatever software you choose delivers features like scheduling, layout control, content control, analytics tools, etc.
-
Finally, you’ll also need a Stable Internet Connection since it will keep your digital signs operating without interruption while allowing dynamic updates from remote sources if required.
Steps for Turning a TV Into Digital Signage
Digital sign-boards are a great way to seize customer attention and promote your business, products, and services. It’s also a super simple way to keep customers notified of new updates or promotions. You can effortlessly turn your existing TV into digital signage with just a few simple steps. Let’s take a peek at what it takes to get started!
Step 1: Choose and Set Up a Controller Device
If you already have a computer that meets the minimum prerequisites for the digital display software, then an HDMI cable that will connect the PC to your TV will be required only. It could be any Mac or PC with an HDMI output. A Raspberry Pi ($35 computer) is enough as well. This will permit you to utilize your existing computer as the digital signage player. Connect the controller device to the screen.

Step 2: Create a Dashboard with Dashmaster 2k (Digital Signage Software)
Once you have set up your device or player, it’s time to configure the digital signage software. With Dashmaster 2k, this step gets way easier, as no download is required.
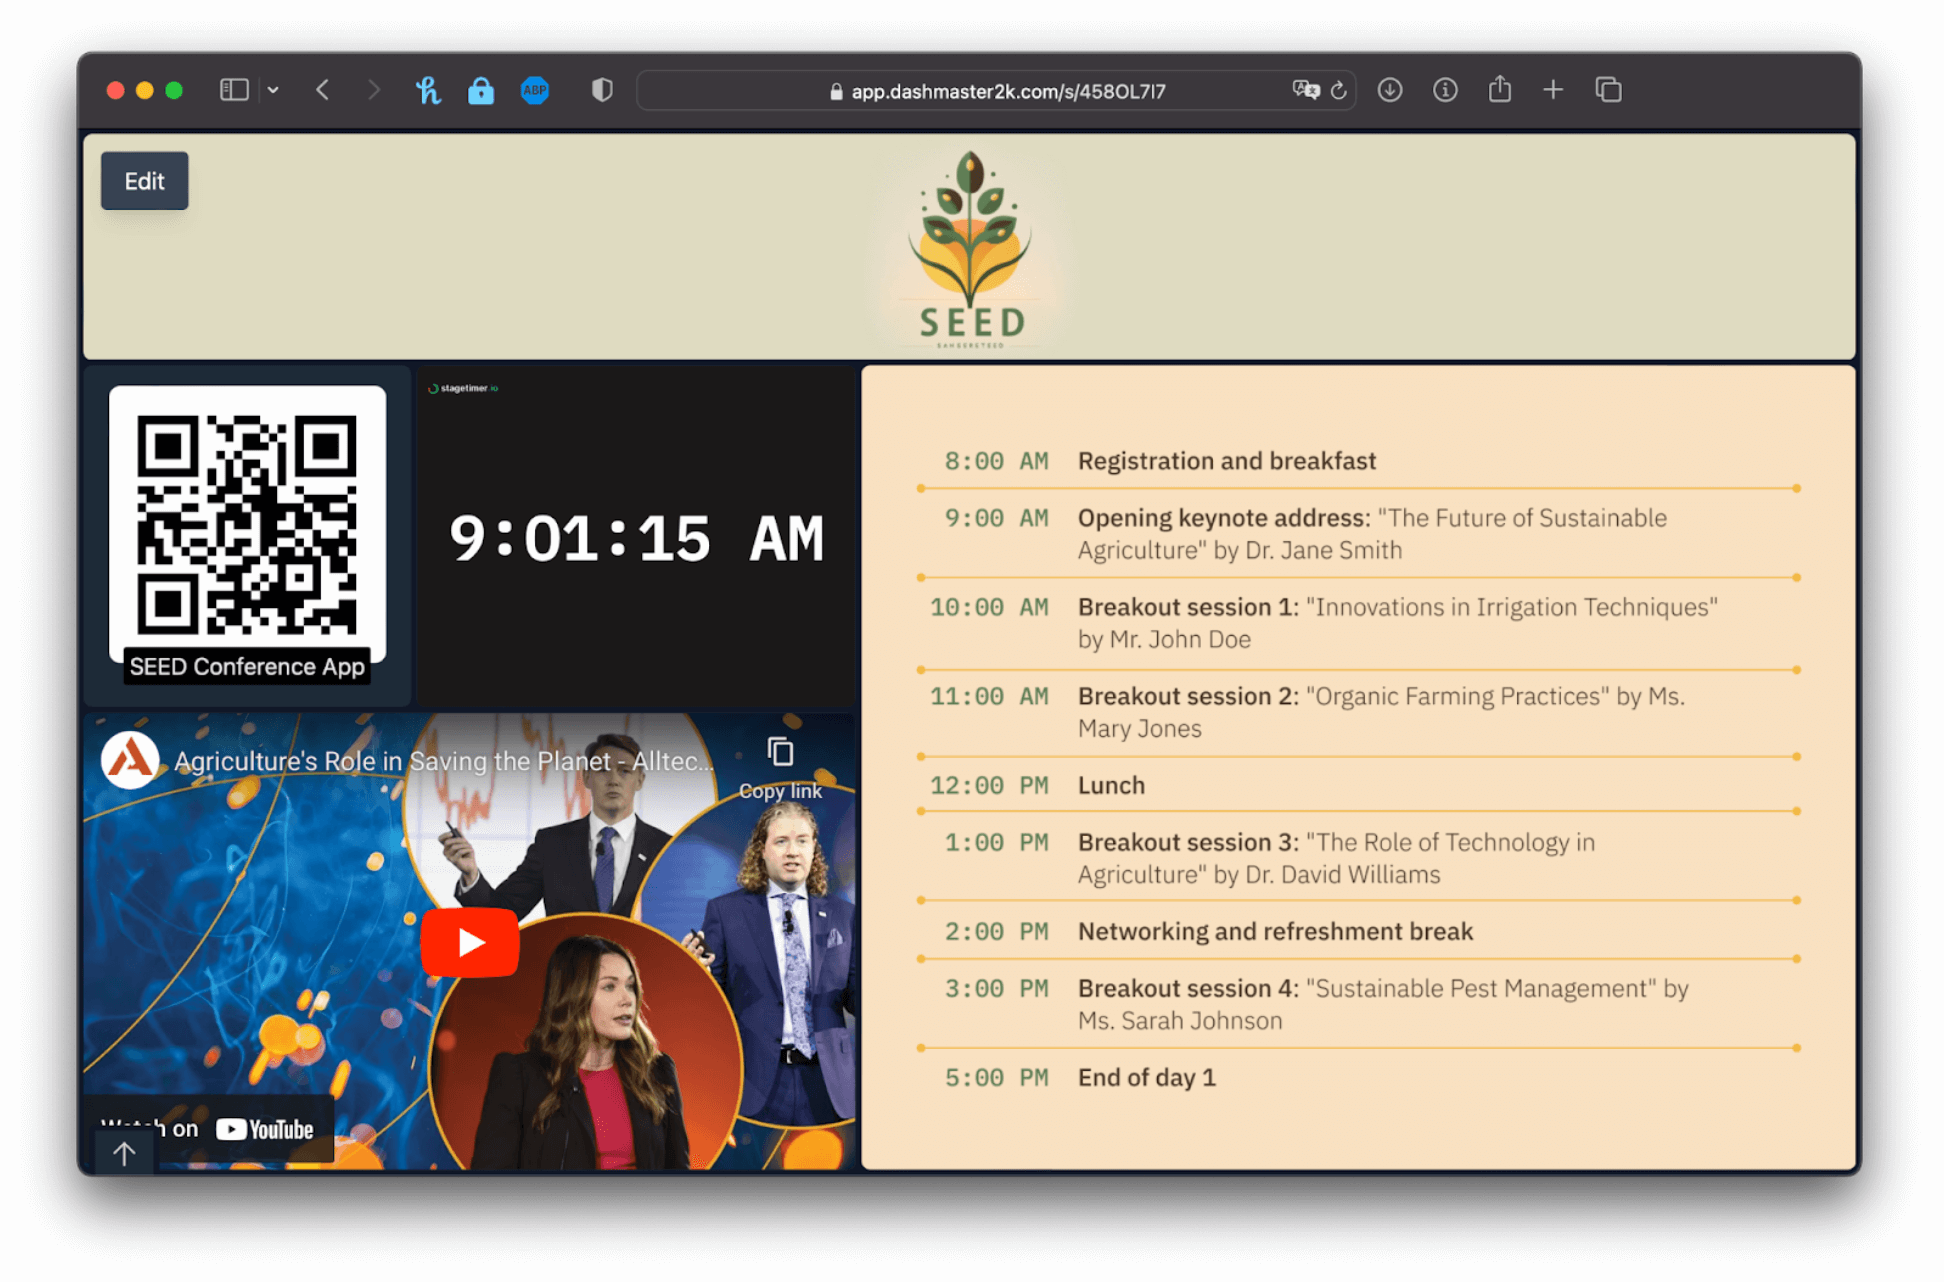
Go to https://dashmaster2k.com/ and create an account to organize content, manage your device remotely, and to manage the dashboards later. Click here to create a new Dashboard. Creating a dashboard on Dashmaster is easy and totally free. You can then customize your dashboard by adding widgets based on integrations. Take a look at this example dashboard to get the gist of it.

Step 3: Assign the Dashboard to the Controller Device
After your digital signboard display is set up and configured, it’s time to assign the Dashboard to your controller device. To do this, follow these steps.
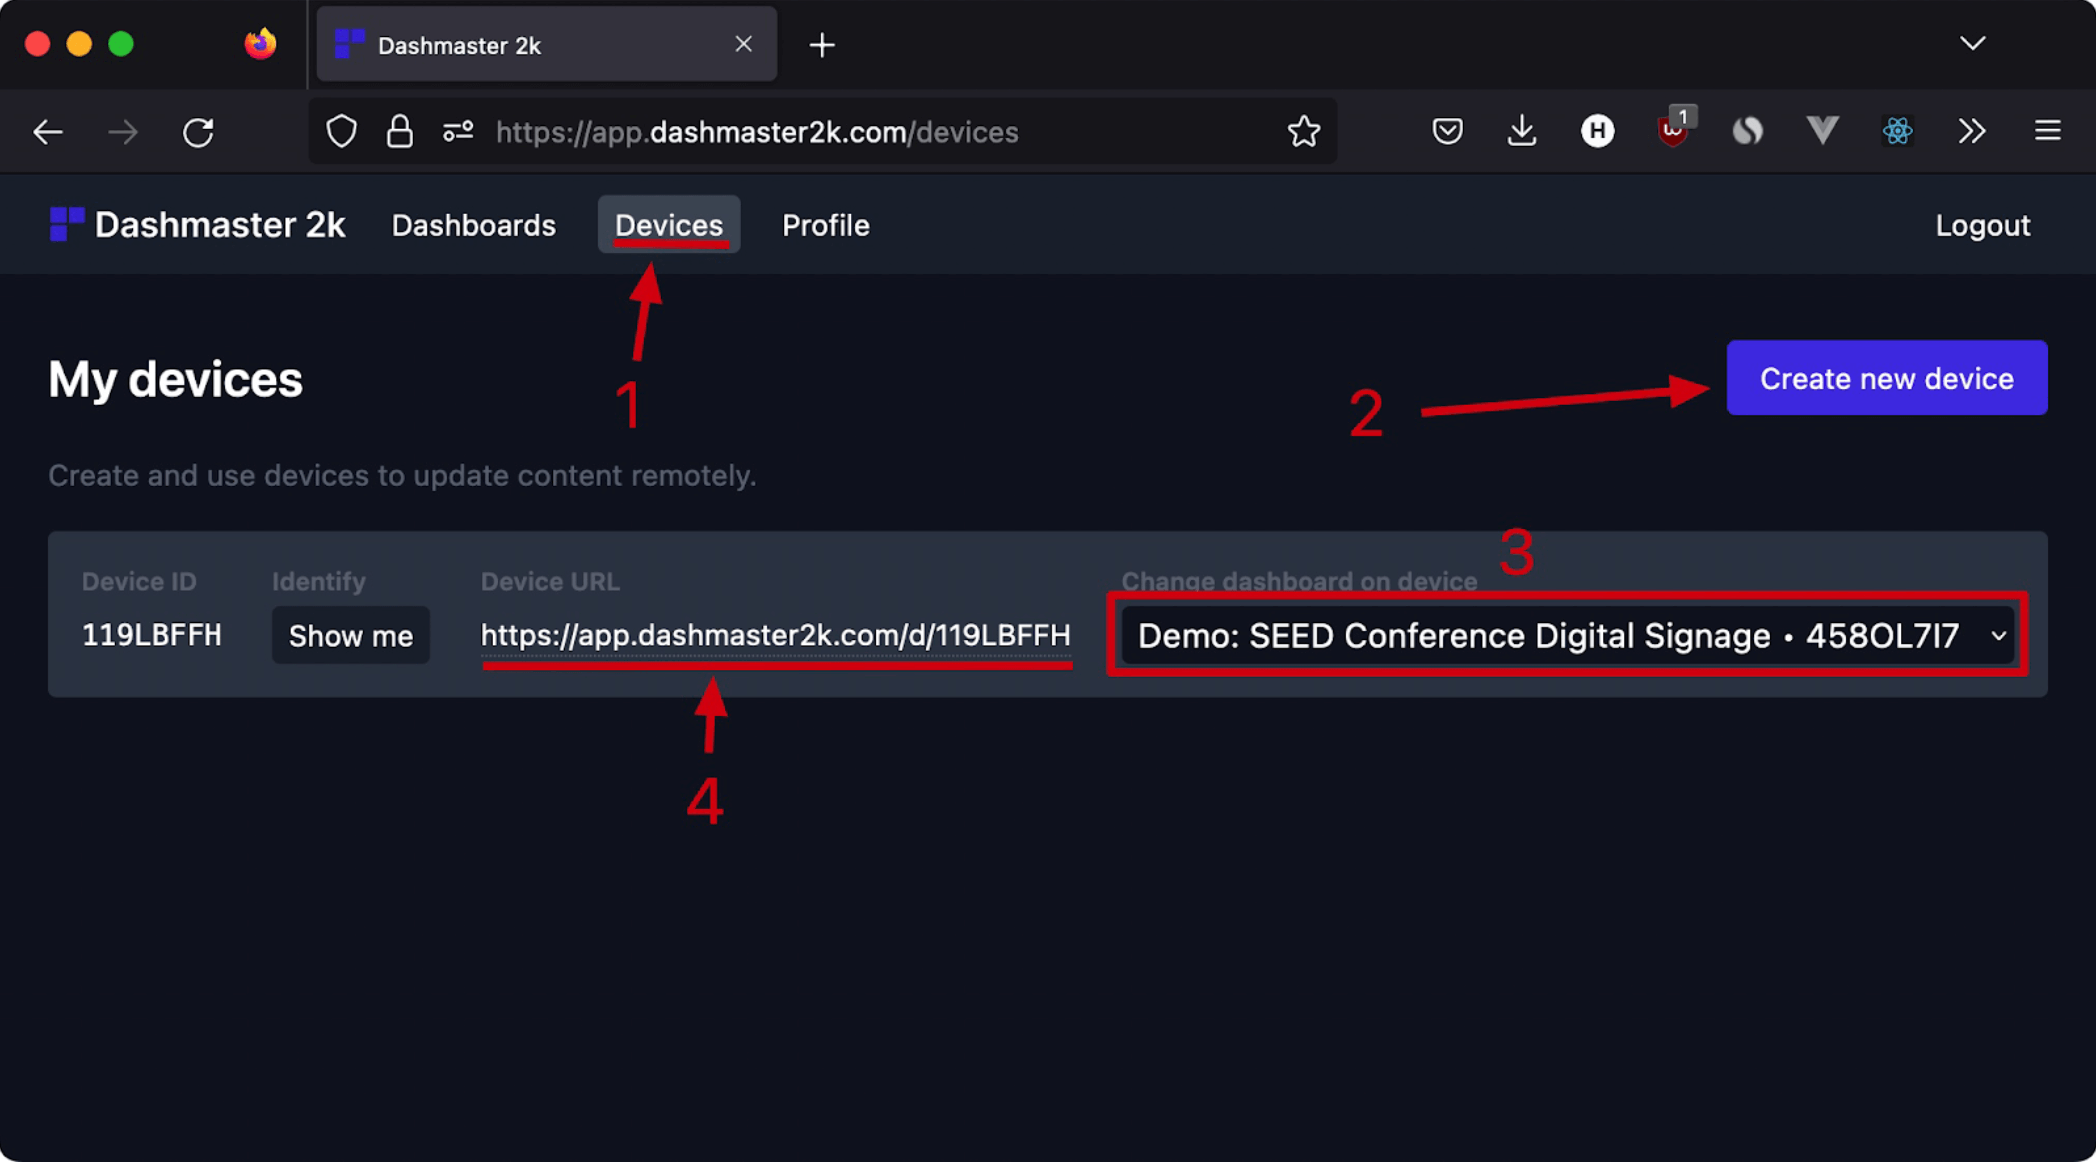
- Go to the “Devices” tab on Dashmaster 2k.
- Create a new device.
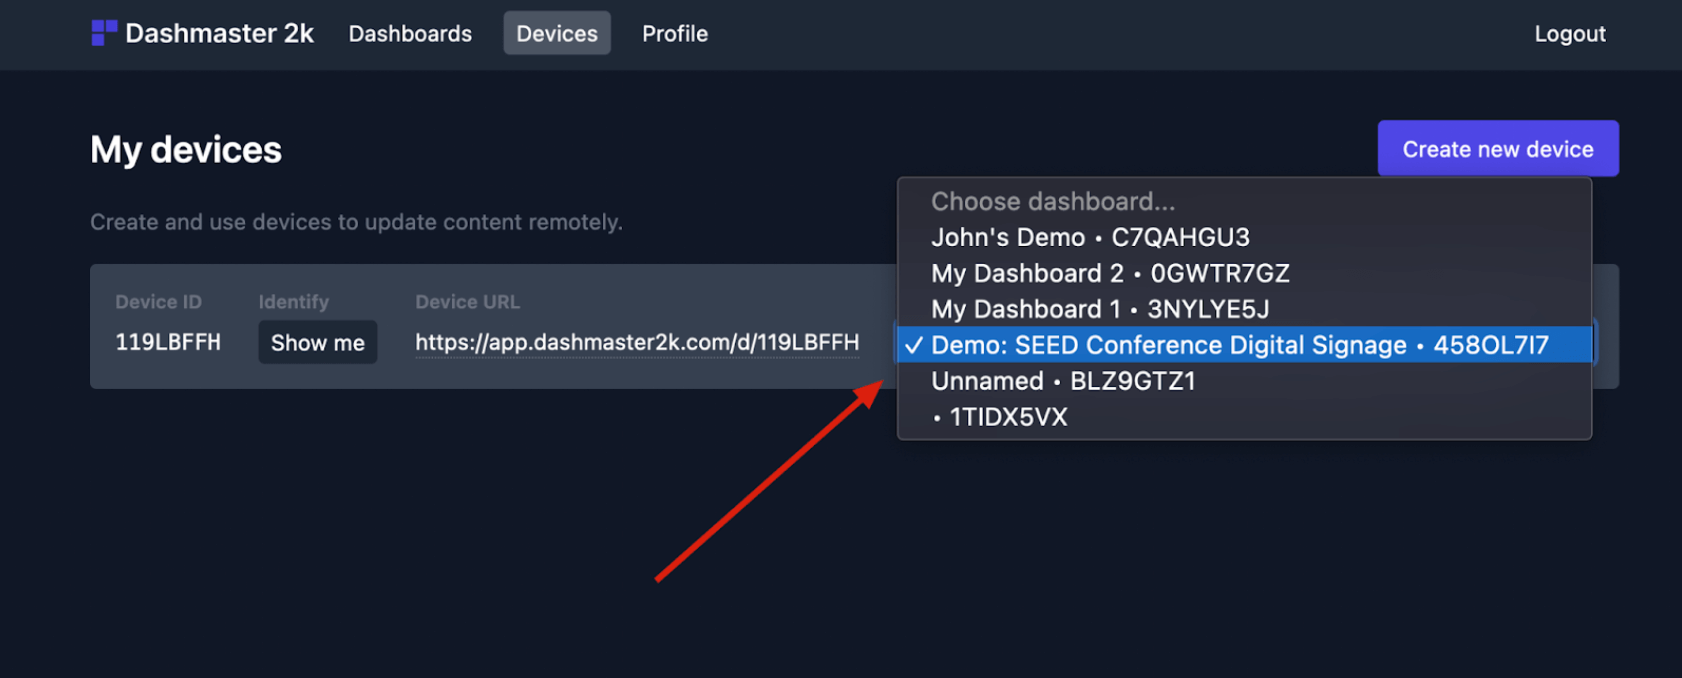
- Choose the dashboard you created in Step 2.

Step 4: Manage Content Using the Software
You’re good to go after setting everything up. Make sure everything is connected precisely.
- Once everything has been tested and verified as working properly, you can now create as many dashboards as needed.
- Then remotely switch what dashboard is currently being shown on your device.
- You can either create one device per physical screen to control them individually, or just use the same device URL for all of them to control them together.

Step 5: Connect the Controller Device to the TV and Display the Content
Once you’re done with all the above steps, you can then connect the controller device to the TV screen and start displaying the content. Follow these steps.
- Open a browser; Safari, Chrome, Firefox on Mac/PC; Chromium on Raspberry Pi
- Use the “Device URL” from Step 3
- Switch browser window to fullscreen (F11)
- Or start the browser in Kiosk mode with this command
chromium-browser--kiosk https://app.dashmaster2k.com/d/119LBFFH(You can also do this automatically when starting the Raspberry Pi, check out this guide: https://blog.deepgram.com/chromium-kiosk-pi/)

Once everything is up and running, all that’s left to do is share the link with others so they can see what’s going on in real-time! You can share the link via email or social media platforms such as Facebook or Twitter.
Conclusion
Turning a TV into digital signage is a simple and cost-effective way to create dynamic, engaging displays. By following the steps outlined above, you can easily transform a regular TV into a digital signage display and start using it to communicate with your audience.
With no install required and full control over when and what content is displayed on-screen. Dashmaster 2k has made it possible for anyone with access to an internet connection to turn their TVs into sophisticated displays in minutes.
With the help of Dashmaster 2k, you can now turn your TV into digital signage for free! With just a few easy steps, you can have a fully customized dashboard prepared in no time. Whether you are operating a business or want to remain up-to-date on the latest news and trends, digital signage is a persuasive way to get knowledge quickly and easily. So don’t wait any longer; start transforming your TV today!